Showing posts with label apache. Show all posts

Wednesday, 22 April 2015

Complete guide on Apache Virtual Host Configuration in RHEL 7.0

Apache HTTPD is  one of the most used web servers on the internet. A web server is a daemon that speaks the http(s) protocol , a text-based protocol for sending and receiving objects over a network connection
The term Virtual Host refers to the practice of running more than one website (such as site1.vinil.com and site2.vinil.com) on a single machine.
There are 2 types of Virtual hosts, they are  "IP-based" and "Name-based". 
IP-Based Virtual Host:  If you need  to have two websites (with two different ip-addresses) on the server that runs Apache,then that physical server should have two different ip-addresses configured. 
Name-Based Virtual Host: when Apache webserver receives a request it looks for the hostname in the HTTP header and depending on the hostname it serves different websites. This is very easy, as you need only one ip-address on that physical server; but you have to update the DNS with multiple website names pointing to the same ip-address.
I am not going to deep on the types of Virtual Host here. Let us check how to configure the Virtual Host in Redhat Enterprise Linux 7.0.
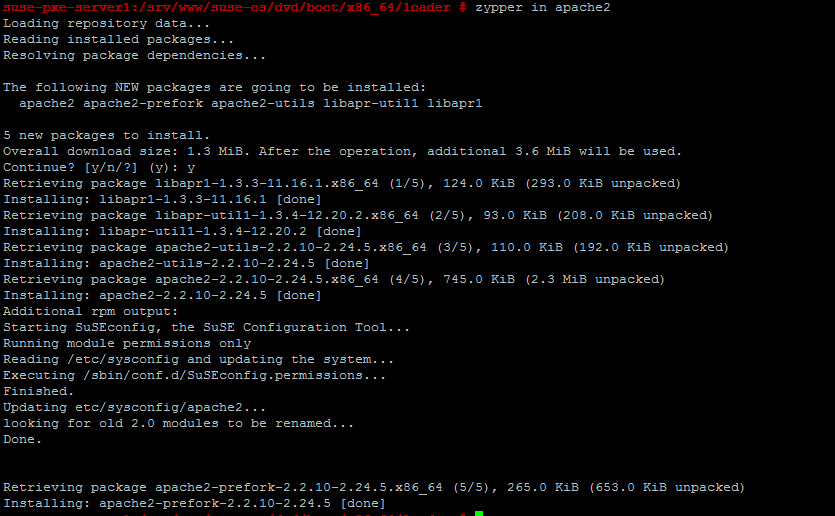
First we need to install the HTTP (apache) package on the server using YUM.
If the YUM is not configured on your server refer the following link to configure YUM:
run the following command to install the HTTP package.
#yum install httpd -y
yum

run rpm -qlc httpd  command to list all the configuration files in the HTTPD package.
httpd files
The default configuration file is /etc/httpd/conf/httpd.conf. In this file we have a lot of configuration directives. Let us check some of the important directives in the httpd.conf file.
httpd conf

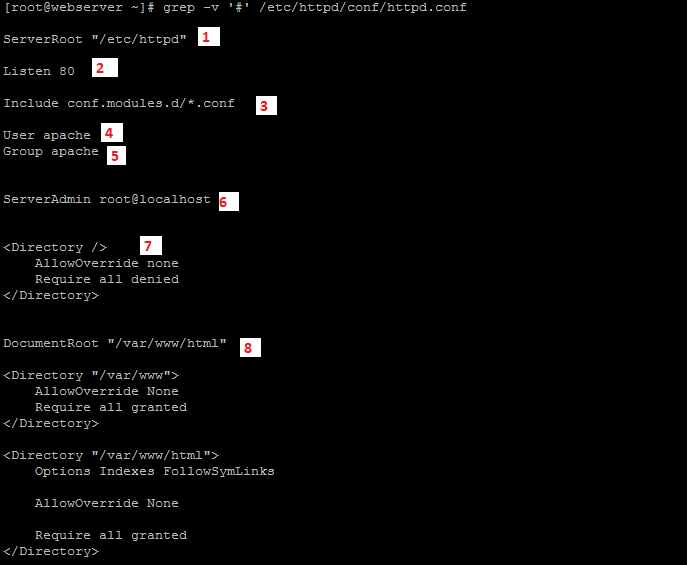
1. This directive specifies where httpd will look for any files referenced in the configuration files with a relative path.
2. This directive tells httpd to start listening on port 80/tcp on all interfaces. To only listen on selected interfaces, the syntax is "Listen 1.2.3.4:80".
3. This directive includes other files, as if they were inserted into the configuration file in place of the Include statement.
4,5 These 2 directive specify the user and group the httpd daemon should run as.
6. some error pages generated by httpd can include a link where users can report a problem. Setting this directive to a valid email address will make a webmaster easier to contact for users.
7. A <Directory> block sets configuration directives for a specified directory, and all descendant directories. 
Common directive inside the <Directory> block include the following.
AllowOverride None: .htaccess files will not be consulted for per directory configuration settings. Setting this to any other setting will have a performance penalty, as well as the possible security ramification. 
Require All Denied: httpd will refuse to serve content out of this directory, returning a HTTP/1.1 403 Forbidden error when requested by a client.
Require All Granted: Allow access to this directory. Setting this on a directory outside of the normal content tree can have security implications.
Options [[+|-] OPTIONS]... Turn on (or off) certain options for a directory. For example, the Indexes option will show a directory listing  if a directory is requested and no index.html file exists in that directory.
8. This setting determines where httpd will search for requested files. it is important that the directory specified here in both readable by the httpd (both regular and SELinux Permission).
There are many other directives in httpd.conf you could refer man pages to get more information on that.

Let us configure the Virtual Host now. Virtual Host is configured using <VirtualHost> block inside the main configuration. To ease of administration, these Virtual Host blocks are typically not defined inside /etc/httpd/conf/httpd.conf, but rather in separate .conf files in /etc/httpd/conf.d/.
Create a file named site1.conf file under  /etc/httpd/conf.d/ and add the following entries.
vhost conf

1. This is the main tag of the block. The 192.168.1.11:80 part indicates to httpd that this block should be considered for all connections coming in on that IP/Port combination.
2. Here is the DocumentRoot is being set, but only for within this virtual host.
3. This setting is used to configure name-based virtual hosting. if multiple <VirtualHost> blocks are declared for the same IP/Port combination, the block that matches ServerName with the hostname: header sent in the client http request will be used.
4. To help sorting mail messages regarding the different websites, it is helpful to set unique ServerAdmin mail address for all virtual hosts.
5. The location of all error messages related to this virtual host.
6. The location for all access messages regarding this virtual host.
7. This provides access to the DocumentRoot Defined. 
Now let us create a directory for DocumentRoot where we put our webpage. Run the following command to create the directory.
#mkdir -p /srv/site1/www
web dir creation
Create an index.html web-page to test the virtual host configuration using any editor. I am using cat command to create a test page here.
index.html
Now set the necessary SELinux Permissions. The default SELinux policy is restrictive as to what context can be read by httpd. The default selinux context for web server content is httpd_sys_content_t . We need to set this SELinux context to new DocumentRoot using semanage command. semanage command is a part of policycoreutils-python-2.2.5-11.el7.x86_64 package. Install it if the semanage command is not available on your system. Run the following commands to set the fcontext on /srv/site1/www .
# semanage fcontext -a -t httpd_sys_content_t '/srv/site1/www(/.*)?'
# restorecon -Rv /srv/site1/www
selinux
start the httpd service and enable it on startup and create a firewall rule for httpd using the following commands.
# systemctl start httpd
# systemctl enable httpd
# firewall-cmd --add-service=http --permanent
# firewall-cmd --reload

http start and firewall

Check your webpage using a browser or elinks command to test the Virtual Host functionality.
webpage
And it works!! That’s all! I will be coming up with few more interesting articles on Linux, till then stay tuned to Learn linux and don’t forget to add your valuable comments

Monday, 13 April 2015

SLES 11 - Complete PXE Server configuration to install SuSE Liunx Enterprise Server 11

Hello Friends

Its been long time i did not put any contents in my blog. I was doing research in some interesting stuffs in linux and also busy with work. This time i am coming up with SuSE Linux Enterprise Server 11 not with Redhat. ! 
Let us discuss about how do we configure PXE server to install SuSE Linux Enterprise server OS into Clients. Similar post on RHEL 7 can be found on the following link : Complete Guide for PXE Server configuration in RHEL 7.0

Breaking down the task to configure PXE Server, Here is the list :

1. DHCP server  ( To provide IP address to client )
2. Apache2 Server configuration ( To transfer the DVD image to Client for OS installation)
3. TFTP server configuration ( To Transfer the PXE kernel and other supporting files to Client System )
Check the version of SUSE Linux using the following command.

suse release


Let us configure DHCP Server first. for that we need to install the dhcp-server package into server.
I am using Zypper to install dhcp server pakage. or else you could run #yast dhcp-server to install and configure dhcp server.

# zypper in dhcp-server
dhcp-server package installation
Now configure dhcp server. edit the /etc/dhcpd.conf and update the following entries.
(Move original /etc/dhcpd.conf file to some other name and create new dhcpd.conf with the following entries.)
Here IP range is from 192.168.1.10 to 192.168.1.20

default-lease-time 14400;
ddns-update-style none;
subnet 192.168.1.0 netmask 255.255.255.0 {
  range dynamic-bootp 192.168.1.10 192.168.1.20;
  default-lease-time 14400;
  max-lease-time 172800;
  next-server 192.168.1.3;
  filename "pxelinux.0";
}


update the /etc/sysconfig/dhcpd file with the following entries.
DHCPD_INTERFACE="eth0"
dhcp startup


Restart the dhcpd service and enable it on start-up using the following command.
# rcdhcpd restart
#chkconfig --level 35 dhcpd on

dhcp service startup


Step1 is finished. Now lets configure http to share the DVD image.install the apache2 package using the following command.

# zypper in apache2


Mount the SuSE Linux DVD into /srv/www/suse-os/dvd directory.
#mkdir -p /srv/www/suse-os/dvd
#mount /dev/sr0 /srv/www/suse-os/dvd


dvd mount


DVD is mounted, make the mount point persistent across reboot. add the following entry in /etc/fstab
/dev/sr0             /srv/www/suse-os/dvd       iso9660 defaults        0 0

I am going to configure a virtual host in apache to provide the DVD image.
create a file named suse-os.conf under /etc/apache2/vhosts.d/ and add the following lines into suse-os.conf file.

<VirtualHost *:80>
    ServerAdmin vinil@vinizlinux.com
    ServerName pxe-suse.vinizlinux.com
    DocumentRoot /srv/www/suse-os
    <Directory "/srv/www/suse-os">
       Options Indexes FollowSymLinks
       AllowOverride None
       Order allow,deny
       Allow from all
    </Directory>

</VirtualHost>
vhost configuration


Start the apache using #rcapache2 start
rcapahe2 start

And enable the apache in startup using #chkconfig --level 35 apache2 on  and then check the apache in a web browser.


web browser


Now the final part  let us work on tftp part.
for configuring tftp we need to install the tftp package also we need the syslinux package which contains the pxelinux kernel to boot the client from PXE server.
Run the following command to install tftp and syslinux package.
# zypper in tftp syslinux
tftp syslinux pakage install

Edit the tftp configuration file /etc/xinetd.d/tftp and change the following line to "no".
 disable                 = no


create the tftpboot directory under / and create the pxelinux.cfg directory under /tftpboot
dir create

now copy the pxelinux.0 file to /tftpboot.

# cp /usr/share/syslinux/pxelinux.0 /tftpboot/
We need to copy some more supporting files for PXE boot for that we need to mount the SuSE OS DVD.

#mkdir -p /srv/www/suse-os/dvd

# mount  /dev/sr0 /srv/www/suse-os/dvd

This same mount point can be used in Apache for giving the OS image to PXE clients. cd to /srv/www/suse-os/dvd/boot/x86_64/loader/ directory where we have the kernel , initrd, boot tests etc.
# cd /srv/www/suse-os/dvd/boot/x86_64/loader/
# cp linux initrd bootlogo memtest message biostest /tftpboot/

Copy the isolinux.cfg file to /tftpboot/pxelinux.cfg/ as default
# cp isolinux.cfg /tftpboot/pxelinux.cfg/default


pxe linux


Now edit the default file and provide the installation source and method of installation. here i am using ssh based suse installation. you could use vnc or ssh to do installation. Entries in the default file is shown below.


Now restart the xinetd services using the following command. and enable it on startup.
# rcxinetd start
#chkconfig --level 35 xinetd on

This installation is not fully automatic we need to give some inputs to complete the installation. for the automated installation we need to configure autoyast. i will put a new post on it later.
Now lets boot the client and check whether its able to boot or not. 
Yes !! Yes!! its able to boot from PXE Server

boot menu

Now type linux on the prompt it will start installation.
After sometime you will see the following screen to start installation. you need to connect this client from anywhere using ssh to provide inputs for finishing the installation.

Here we are using ssh -X , and  X is for X11/X.org forwarding. 
Let us connect the client and check the installation.

Now run yast on prompt it will open a GUI interface to start installation.
Follow the on-screen options and finish the installation.


That’s all! I will be coming up with few more interesting articles on Linux, till then stay tuned to Learn linux and don’t forget to add your valuable comments


Saturday, 1 November 2014

Apache based YUM server configuration in RHEL 7.0

Hello Friends,

Greetings to you all ! 
Here is the video tutorial on Apache based YUM server configuration in RHEL 7.


Quick reference :

Check the Redhat Linux Vesion using the following command :
# cat /etc/redhat-release
Red Hat Enterprise Linux Server release 7.0 (Maipo)

Check the required softwares are installed for configuring YUM server :
# rpm -qa |grep -e httpd -e createrepo
httpd-tools-2.4.6-17.el7.x86_64
httpd-2.4.6-17.el7.x86_64
createrepo-0.9.9-23.el7.noarch

For configuring Apache based YUM server we can divide this process into 3 parts :
  1. YUM repository configuration
  2. Apache configuration (httpd)
  3. YUM client configuration
YUM repository configuration :

Mount the RHEL 7 DVD into the server
# mount -t iso9660 /dev/sr0 /dvd

Check the contents of the dvd :
# ll /dvd
total 816
dr-xr-xr-x.  4 root root   2048 Apr  9  2014 addons
dr-xr-xr-x.  3 root root   2048 Apr  9  2014 EFI
-r--r--r--.  1 root root   8266 Apr  4  2014 EULA
-r--r--r--.  1 root root  18092 Mar  6  2012 GPL
dr-xr-xr-x.  3 root root   2048 Apr  9  2014 images
dr-xr-xr-x.  2 root root   2048 Apr  9  2014 isolinux
dr-xr-xr-x.  2 root root   2048 Apr  9  2014 LiveOS
-r--r--r--.  1 root root    108 Apr  9  2014 media.repo
dr-xr-xr-x.  2 root root 778240 Apr  9  2014 Packages
dr-xr-xr-x. 24 root root   6144 Apr  9  2014 release-notes
dr-xr-xr-x.  2 root root   4096 Apr  9  2014 repodata
-r--r--r--.  1 root root   3375 Apr  1  2014 RPM-GPG-KEY-redhat-beta
-r--r--r--.  1 root root   3211 Apr  1  2014 RPM-GPG-KEY-redhat-release
-r--r--r--.  1 root root   1568 Apr  9  2014 TRANS.TBL

Create a directory /yum for holding all the rpms  
# mkdir /yum

Copy all the RPMs from DVD to /yum using the following command.
# cp -r /dvd/Packages/*.rpm /yum 

Create meta data for all the packages for copied in /yum we need to run createrepo command.

#cd /yum
# createrepo .

you will see a repodata directory under /yum. under repodata you could see the following files. 

#ls /yum/repodata

repomd.xml --> this is the file that describes the other metadata files. It is like an index file to point to the other files. It contains timestamps and checksums for the other files. This lets a client download this one, small file and know if anything else has changed. This also means that cryptographically (ex: gpg) signing this one file can ensure repository integrity.

primary.xml.gz --> this file stores the primary metadata information. This includes information such as name, epoch, version, release, architecture, file size, file location, description, summary, format, checksums header byte-ranges, dependencies, provides, conflicts, obsoletes, suggests, recommends,file lists for the package for CERTAIN files – specifically files matching: /etc*, *bin/*, /usr/lib/sendmail

filelists.xml.gz -->  this file stores the complete file and directory listings for the packages. The package is identified by: name, epoch, version, release, architecture and package checksum id.

other.xml.gz --> this file currently only stores the changelog data from packages. However, this file could be used for any other additional metadata that could be useful for clients.

For running group commands like grouplist, groupinstall we need to copy *-comps-Server.x86_64.xml and using this file we need to update the metadata again using the following command.

#cd /yum/repodata
#cp 76a190afa1c59e14d3a03f9b03c3eee31df0099f1193528ebb87d4d493d2b686-comps-Server.x86_64.xml /yum/
# createrepo -g 76a190afa1c59e14d3a03f9b03c3eee31df0099f1193528ebb87d4d493d2b686-comps-Server.x86_64.xml /yum

NOTE: Whenever we add any packages (RPMs) to /yum we need to run createrepo and createrepo -g to update metadata so that the YUM server can detect newly added packages.

Now let us add the gpgcheck to /yum. If set to 1, verify the authenticity of the packages by checking the GPG signatures. You might need to set gpgcheck to 0 if a package is unsigned, but you should be wary that the package could have been maliciously altered.

For enabling this feature we need to copy the gpgkey from DVD.
# cp /dvd/RPM-GPG-KEY-redhat-release /yum 

Apache configuration (httpd) :

Now let us work on Apache side . Edit the Apache main configuration fie /etc/httpd/conf/httpd.conf and add the following lines at the bottom of httpd.conf.
<Directory "/yum">
    AllowOverride None
    Require all granted
</Directory>

Create repo configuration file under /etc/httpd/conf.d/ using the following command and add the following line.

# vi /etc/httpd/conf.d/repo.conf
Alias /repo/ "/yum/"

Start Apache service and enable the apache at server bootup.
# systemctl start httpd --> Start the apache service
# systemctl enable httpd --> enable the apache service at bootup
# systemctl status httpd --> check the apache status

Let us check the SElinux policy of this server. currently SElinux is enabled and its in Enforcing mode.
# getenforce
Enforcing

if the SElinux is enabled Apache cannot access the /yum directory because it has different SElinux contexts.

# ls -ldaZ /yum
drwxr-xr-x. root root unconfined_u:object_r:default_t:s0 /yum

look at the SElinux context for Apache document root /var/www/html. This means Apache service can access httpd_sys_content_t type context.

# ll -ladZ /var/www/html
drwxr-xr-x. root root system_u:object_r:httpd_sys_content_t:s0 /var/www/html

So we need to change /yum SElinux context to httpd_sys_content_t for enabling access to Apache. run the following command to provide access.
# chcon -R -t httpd_sys_content_t /yum

Now let us check the firewall status. firewall is currently running.
# systemctl status firewalld.service
firewalld.service - firewalld - dynamic firewall daemon
   Loaded: loaded (/usr/lib/systemd/system/firewalld.service; enabled)
   Active: active (running) since Sat 2014-11-01 01:26:15 EDT; 1h 32min ago
 Main PID: 871 (firewalld)
   CGroup: /system.slice/firewalld.service
           └─871 /usr/bin/python -Es /usr/sbin/firewalld --nofork --nopid

Nov 01 01:26:15 server3 systemd[1]: Started firewalld - dynamic firewall daemon.
Hint: Some lines were ellipsized, use -l to show in full.

We need to create a rule for Apache to provide access to external network. run the following commands to create rule.
# firewall-cmd --permanent --zone=public --add-port=80/tcp 
# firewall-cmd --reload --> reload the  new rule.
# firewall-cmd --list-all --> verify the firewall rule.

Check the Apache is able to access the /yum contents now. you could use the following command.
#links http://localhost/repo/repodata/repomd.xml
NOTE: elinks rpm should installed in the server.

YUM client configuration :
Create a client repo configuration file under /etc/yum.repos.d/ and add the following lines to access the YUM server.

#vi /etc/yum.repos.d/www.repo
[www-repo]
name=vinil yum http
baseurl=http://192.168.1.6/repo
enabled=1
gpgcheck=1
gpgkey=http://192.168.1.6/repo/RPM-GPG-KEY-redhat-release

run the following command to check the YUM server access.
# yum clean all   --> Clean the metadata in YUM server
# yum repolist --> check the repo list
# yum install ftp   --> install the required package.

Hope you enjoyed this topic! I would love to hear the feedback from you.

Wednesday, 2 April 2014

Patch Management in RHEL-6 using YUM (httpd based)

Greetings Friends,

Two weeks back me and my friends had a discussion on Linux Patching. We were talking on Satellite Server where we can pull the update from Redhat and then we can deploy to the clients.
My friends were looking for a solution where they can download the patches from Redhatand keep it in the Server and then they can update the clients as and when required.

The purpose of implementing YUM server is to have a centralize repository of packages/rpm’s. Also, the main motive behind it is to have a centralize patch management system, where you can download the packages from Redhat website and store it on central location.By configuring YUM we can save efforts to install/update any package on the server. Also, we can apply latest bug fixes and hot fixes with less manual efforts.

I have taken this discussion as an opportunity to explore more on RHEL patching side. And I could create a Centralized Patch (update) server using YUM (httpbased) for updating the clients. Here is the steps that I performed to configure the server. I kept all the steps and screenshot with this article so its bit long. Hope this would help you guys as well.

Here I am using RHEL 6.3 release
[root@server-yum ~]# cat /etc/redhat-release


Red Hat Enterprise Linux Server release 6.3 (Santiago)

Pre-requisites for creating the Centralized patch/update YUM server are:

  1. Apache software (httpd-2.2.15-29.el6_4.i686)
  2. YUM download only plugin rpm (yum-plugin-downloadonly-1.1.30-14.el6.noarch)
  3. Createrepo rpm (createrepo-0.9.9-18.el6.noarch)
  4. Internet connectivity (which is required to contact Redhat server for pulling updates)
  5. RHEL 6.3 OS DVD for copying the rpms and creating rpm.
  6. Valid redhat (RHN) login ID and password for downloading the update from Redhat


Check the required rpms are installed in the server.

[root@server-yum ~]# rpm -qa | grep -i httpd
httpd-2.2.15-29.el6_4.i686
 [root@server-yum ~]# rpm -qa | grep -i Yum
yum-plugin-downloadonly-1.1.30-14.el6.noarch
 [root@server-yum ~]# rpm -qa | grep -i create
createrepo-0.9.9-18.el6.noarch


First we need to configure apache server.in this setup I am using http protocol for YUM server.
For configuring the apache we need to edit the apache configuration file /etc/httpd/conf/httpd.conf
and change the following lines:

ServerAdmin root@192.168.1.5
ServerName 192.168.1.5:80
DocumentRoot "/var/www/html"


Mount the DVD and using mount command to any directory here I am using /mnt for mounting the DVD in my server.


Now we need to copy all the rpms from the RHEL6 DVD to /var/www/html for creating the repo.
In the RHEL DVD you have 3 directories which contains rpms. They are Packages ,HighAvailability& LoadBalancer. Run the following commands to copy the rpms directories to /var/www/html location.


Once you have copied all the RPMs you start or restart Apache. Using the following command.
[root@server-yum ~]# service httpd restart

Now we need to run createrepo command to create database of the rpm’s. Using createrepo command.
[root@server-yum ~]# cd /var/www/html/Packages/
[root@server-yum Packages]# createrepo .


[root@server-yum Packages]# cd /var/www/html/LoadBalancer/
[root@server-yum LoadBalancer]# createrepo .


[root@server-yum LoadBalancer]# cd /var/www/html/HighAvailability/
[root@server-yum HighAvailability]# createrepo .


You might be thinking why we are copying all RPMs in different directories why can’t we copy all the RPMs into a single directory and run single createrepo command to create a single RPM database.
It is possible to create a single directory and copy all the RPMs into that and run the createrepo .however we cannot use the groupinstall or gouplistand all RPM group related commands.

Now we need to create group of RPM’s for convenient installation of Packages using the following command.
If we don’t create group you would get the following error message when you run the group related commands from client machine like groupinstall ,grouplist etc.

[root@yum-client yum.repos.d]# yum grouplist
Loaded plugins: product-id, refresh-packagekit, security, subscription-manager
Updating certificate-based repositories.
Unable to read consumer identity
Setting up Group Process
Error: No group data available for configured repositories
[root@yum-client yum.repos.d]#

So we need to create a group repo file to fix these kind of issue or to use group rpm related command in YUM.

Now for running the createrepo command for group of RPM you need to have a XML file. This file would be under the repodata directory in the DVD and the end of file name as –comps-rhel6-server.xml
Filename would be something similar to this:
9e621fc619d1eccd6fb49237c666f0ce4c68f93fab753cf9a840c7600dc4f30a-comps-rhel6-Server.xml


You need to copy this XML file to all the RPM directories under the /var/www/html.
[root@yum-server repodata]# cp /cdrom/repodata/9e621fc619d1eccd6fb49237c666f0ce4c68f93fab753cf9a840c7600dc4f30a-comps-rhel6-Server.xml /var/www/html/Packages/

[root@yum-server repodata]# cp /cdrom/repodata/9e621fc619d1eccd6fb49237c666f0ce4c68f93fab753cf9a840c7600dc4f30a-comps-rhel6-Server.xml /var/www/html/HighAvailability/

[root@yum-server repodata]# cp /cdrom/repodata/9e621fc619d1eccd6fb49237c666f0ce4c68f93fab753cf9a840c7600dc4f30a-comps-rhel6-Server.xml /var/www/html/LoadBalancer/
[root@yum-server repodata]#


Then you need to run the createrepo command using the following command in each RPM directory.
[root@server-yum repodata]# createrepo -g /var/www/html/Packages/9e621fc619d1eccd6fb49237c666f0ce4c68f93fab753cf9a840c7600dc4f30a-comps-rhel6-Server.xml /var/www/html/Packages/
Spawning worker 0 with 2842 pkgs

Worker 0:
Worker 0: iso-8859-1 encoding on Ville Skyttä <ville.skytta@iki.fi> - 2.8.2-2
Worker 0:
Workers Finished
Gathering worker results

Saving Primary metadata
Saving file lists metadata
Saving other metadata
Generating sqlite DBs
Sqlite DBs complete


[root@server-yum repodata]# createrepo -g /var/www/html/LoadBalancer/9e621fc619d1eccd6fb49237c666f0ce4c68f93fab753cf9a840c7600dc4f30a-comps-rhel6-Server.xml /var/www/html/LoadBalancer/

Saving Primary metadata
Saving file lists metadata
Saving other metadata
Generating sqlite DBs
Sqlite DBs complete
[root@server-yum repodata]#


[root@server-yum repodata]# createrepo -g /var/www/html/HighAvailability/9e621fc619d1eccd6fb49237c666f0ce4c68f93fab753cf9a840c7600dc4f30a-comps-rhel6-Server.xml /var/www/html/HighAvailability/
Saving Primary metadata
Saving file lists metadata
Saving other metadata
Generating sqlite DBs
Sqlite DBs complete
[root@server-yum repodata]#


Testing the YUM Server you can create local repo file and check the some YUM installation commands.

NOTE: In my setup i have disabled the iptables and SELinux. please do take care of you iptables and SElinux

My repo file is /etc/yum.repos.d/vinil.repo


After testing the YUM server functionality locally now we need to register this server with Redhat for getting the update. We can use rhn_registercommand to register the server.


Here is the screen shot of registering the server with Redhat for update


Here you need to use your valid Redhat Login ID and password for login


This will take some time to send the profile to Redhat


Once you have finished the registration then you can download the updates from Redhat using the following command. I have given an option to downloadonly so the update will be downloaded into the local directory it won’t update the server automatically. this packages can be used to update the clients.

[root@server-yum ~]# yum update -y --downloadonly --downloaddir=/var/www/html/Packages/

Loaded plugins: downloadonly, product-id, refresh-packagekit, rhnplugin, security, subscription-manager
Updating certificate-based repositories.
Unable to read consumer identity
Server-Yum                                       | 3.7 kB     00:00
rhel-i386-server-6                               | 1.8 kB     00:00
rhel-i386-server-6/primary                       | 16 MB      03:51
rhel-i386-server-6                               | 9441/9441


You can see the downloaded started and end of this screen you can see some messages like exiting because dowloadonly

Once download is finished you need to run createrepo command again to update the repo database.

[root@server-yum]# cd /var/www/html/ Packages
[root@server-yum Packages]# createrepo .
Spawning worker 0 with 3306 pkgs
Worker 0:
Worker 0: iso-8859-1 encoding on Ville Skyttä <ville.skytta@iki.fi> - 2.8.2-2
Worker 0:
Workers Finished
Gathering worker results

Saving Primary metadata
Saving file lists metadata
Saving other metadata
Generating sqlite DBs


To update the RPM’s group database run the following command

[root@server-yum Packages]# createrepo -g /var/www/html/Packages/9e621fc619d1eccd6fb49237c666f0ce4c68f93fab753cf9a840c7600dc4f30a-comps-rhel6-Server.xml /var/www/html/Packages/
Spawning worker 0 with 3306 pkgs
Worker 0:
Worker 0: iso-8859-1 encoding on Ville Skyttä <ville.skytta@iki.fi> - 2.8.2-2
Worker 0:
Workers Finished
Gathering worker results

Saving Primary metadata
Saving file lists metadata
Saving other metadata
Generating sqlite DBs
Sqlite DBs complete
[root@server-yum Packages]#


The YUM server is ready to give/distribute the update to its clients !!

In the client side you need to create a repo file under /etc/yum.repos.d ,which is pointing to your YUM server. My YUM client repo file looks like the below.


For updating the client with latest packages, fixes and enhancement you can run the yum update command (Patch up system by applying all updates). You could see the entries like this.

root@localhost yum.repos.d]# yum update
Loaded plugins: product-id, refresh-packagekit, security, subscription-manager
Updating certificate-based repositories.
Unable to read consumer identity
Setting up Update Process
Resolving Dependencies
--> Running transaction check
---> Package ModemManager.i686 0:0.4.0-3.git20100628.el6 will be updated
---> Package ModemManager.i686 0:0.4.0-5.git20100628.el6 will be an update
---> Package NetworkManager.i686 1:0.8.1-33.el6 will be updated
---> Package NetworkManager.i686 1:0.8.1-66.el6 will be an update
---> Package NetworkManager-glib.i686 1:0.8.1-33.el6 will be updated


You can give a confirmation that whether to update or not. If give Y then it start updating the client.


After the confirmation you can see the packages is getting updated in the client side


That’s it!!.But there are many other things you can do. For example, yum updateinfo has some handy options. Try the following:


yum updateinfo summary
yum updateinfo list security
yum updateinfo list available
yum updateinfo list bugzillas

To prevent yum command from updating the Kernel type:

yum -y --exclude=kernel\* update

How do I prevent yum from Updating the Kernel permanently?
Edit/etc/yum.conf file, enter:
# vi /etc/yum.conf
Append/modify exclude directive line under [main] section, enter:
exclude=kernel*

Hope you enjoyed this topic. I would love to hear the feedback from you. So please do send me !!